Recently on bentleyuser.org...

© bentleyuser.org 2026
Printed from www.bentleyuser.org © TMC Publications (UK) Ltd 2010
MicroStation 101: V8 Level Manager
by Karen Fugle - 03 February 2004
![]() How do I open it?
How do I open it?
Settings > Level Manager or by using the Level Manager tool in the Primary Tool box.

Or you can click on the Active Level display I the status line at the bottom of your screen.

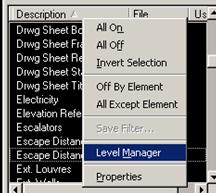
Alternatively, if you are in Level Display (Ctrl E) you can right click on the screen to bring up some options. One of them is Level Manager.
How do I make a level current?
Highlight the level and double click on it
or go to Levels>Set Active.
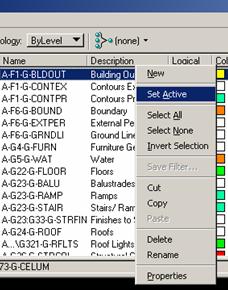
Another way is to highlight the level and right click on it. This will bring up another tool bar
You will see the level change in the bottom left of the dialog box.
How do I turn a Level on or off?
Use Level Display (Ctrl E) for turning levels on or off.
The tick mark in the Level Manager Display column in indicates that the level is on and visible in ALL windows. Instead of turning a level off here use Level Display (ctrl E) as it is a much easier way to control whether levels are on or off.
So how do I create a new level?
The first two tools in the Level Manager tool bar are Create New Level and Delete Level.
Your CAD Manager has the ability to disable these functions as your company may have a standard list of levels to use or it may use the new AEC (UK) levels as the company standard, as we do.
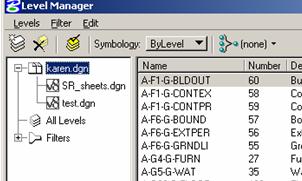
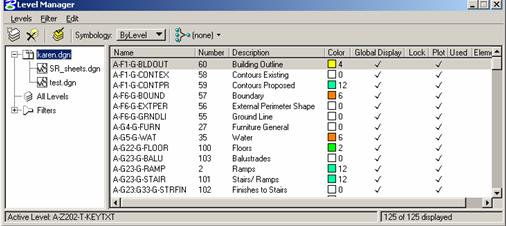
You can view the different levels for each reference file by expanding on the tree (like Windows Explorer) then click on each individual reference file to view the levels.
You will notice one extra new level called the Default Level. This level is necessary and cannot be deleted. Our Default Level is the equivalent to AutoCADs layer 0.
Do not draw on this level.
(NOTE: You may also notice a level called Defpoints when looking at dwgs. This level is like a construction level and will NOT plot.)
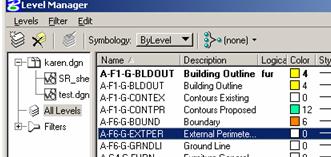
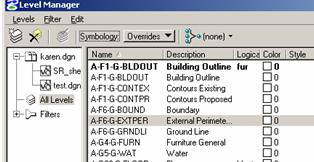
Clicking on All Levels will show all the levels of the Active file plus all the reference files.
If you wish to use this then its a good idea to remember to give each reference file a Logical Name (in the reference file dialog box.). This way when you view All Levels you will be able to see which reference file you are looking at from the Logical column (example below partition levels and Grid levels.)

Can I change the way I view the levels?
Can you see the small triangle next to the column Logical in the example above? The triangle is facing down, this means you are seeing the levels in descending order. Click the column heading again and the triangle is facing up and you are viewing the levels in ascending order. You can click on any of the column headers to get a different view for the levels (e.g. click the Color header to view the levels by ascending or descending colours).
I think I am missing some columns!
One of the new functions in V8 is the ability to hide any tools or columns that you dont wish to see.
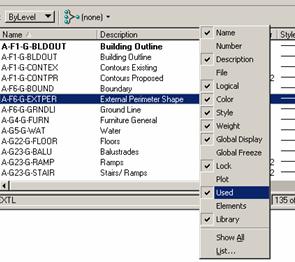
If you right click on the column header a toolbar will appear. You can see the ticks are next to the columns that I can see: name, number etc. To turn columns on or off simply tick or un-tick them.
This way you can customise the level manager to show just what you need to see.
What about the symbology?
There are many ways to use symbology and it can be a very confusing subject. If your company maps its colours (+ line weights or style) to a certain level it will most likely be setting these colours (+ line weights or style) Bylevel in Level Manager. If you set the symbology to ByLevel you will see all the mapped colours (+ line weights or style). When you now choose your level the Bylevel settings will be set along with it.
If you change your symbology to Overrides you will see a different set of colours or no colours at all. Here you can choose your own colours that will override the Bylevel colour. You must have a tick in the Level Symbology box in the View Attributes (ctrl B) dialog box for the overrides to display.
Huh?
Well, in my example below all the colours are mapped in the Bylevel display so that when I draw on a level the colour is automatically set.
If I switch to overrides you can see all my colours are set to 0. If I tick on Symbology in View Attributes (ctrl B) then my drawing will all turn to colour 0, effectively overriding my Bylevel colours.
What about the Levels pull down?
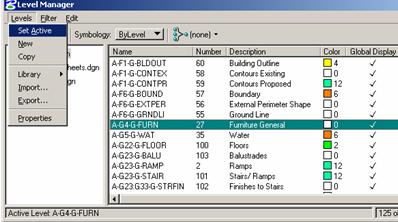
Highlight a level to use, then one of the tools under the Levels pull down.
As mentioned above use the Set Active to make a level active.
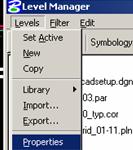
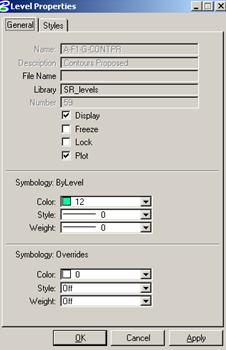
The Properties tool brings up a Properties dialog box for your highlighted level. This is another way of showing you all the level properties.
There are two tabs, General and Styles which set the level properties.